How to Boost Your Event Attendance with Customized Invitations?
If you’re not using webinars as part of your marketing strategy for b2b business, sorry to say, you are leaving a lot of cash on the table. They are a great way to engage your audience, give them extra value, and close the sale. But getting virtual butts in seats can be a challenge. The solution? Create a customized webinar invitation that makes them feel special and eager to log on and hear what you have to say.

ezTalks Webinar Tool
- Free for up to 100 Participants
- Fluent Group Video/Audio/IM Chat
- Screen Sharing and Whiteboard
- Webinar Cloud Recording
- Webinar Custom Branding
But How Do I create a Customized Invitation? The invitation process varies from webinar provider, but the concept is the same. The best webinar invitations address the pain points of the customer. You can get attendees with ads and word-of-mouth but the best webinar invitations are by email. They’re personal and flexible. We’re going to use eztalks webinar to show you how to make your own.
Step 1 Create Your Webinar and Webinar Description
Create a free account with eztalks on eztalks.com. They provide a sweet free trial of 100 webinar minutes. On your dashboard click on the Webinar option, then schedule a webinar. Here you can start entering the details of your webinar.
The webinar topic is important. This draws your audience in. They can see exactly what value they can get from joining your webinar. A customized invitation that says ‘Double Your Freelance Rates in 60 Days’ can increase attendance over ‘Freelance Webinar’. This should also go in any webinar invitation subject lines to grab their attention in their inbox.
Step 2 Don’t Forget the Details
You can show that you are empathetic to your attendees with simple details. Are you aware of their time zones? You can select the time-zone that your attendees will be on, instead of your own. You can even go a step further and place a time zone converter link in your invitation email.
Step 3 Invite and Customize Your Email Message
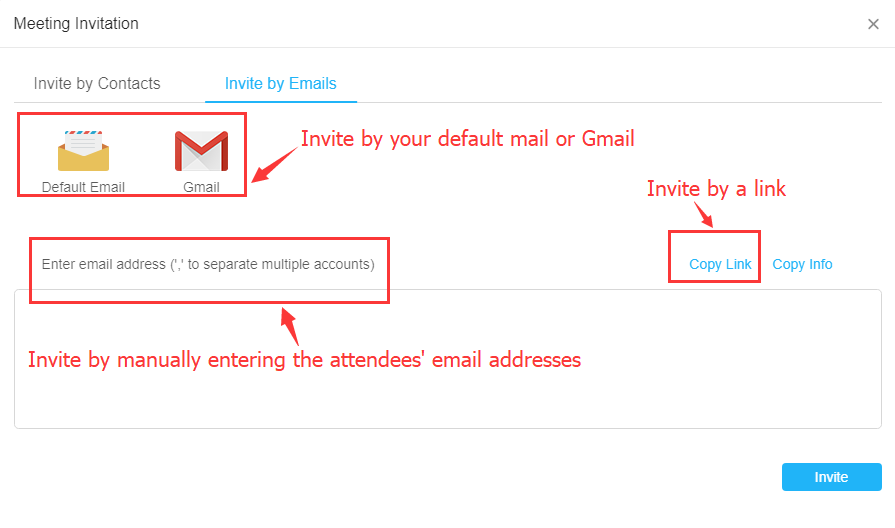
Head back to the My Webinar page, then right-click on your webinar. You will see the Invite option. Here’s where the magic happens. Now we can create our invites manually, via our Gmail Contacts, or by Default Email.

Step 4 Craft Your Customized Email Invitation
Creating great email copy is not for the fainthearted. You can lose your attendees here with bad copy. Or you can have them coming in droves with great copy. Don’t recreate the wheel. You can also get a free webinar invitation template from Mail Charts. Choose from over 60 templates!
Here’s what to add to your webinar invitation email template to increase conversions and engagement.
Use the attendees name: Make sure to use their names in the FROM section of your email. Gmail and other email providers have short codes you can use to put their names in the email body (Example [fname]).
Address pain points: Know exactly what your audience is suffering with and how you could solve it. Are they having problems growing their email list? Are they not closing sales? State in point form how you can help them because you’ve been there.
Be conversational, yet professional: Write like you’re talking to a close friend, without sounding too formal or weird. If you won’t use a word or phrase to speak with your friend, it’s best you leave it out.
Embed Pictures to make a connection: In the email, place pictures of the webinar hosts and their role. State why they/you are qualified to help your audience. Place pictures of your brand in the header to make it feel more professional.
Don’t send one blanket email (if possible): The biggest don’t in email marketing is addressing all customers the same way. If you can segment your message, do so. If someone purchased from you previously, work that into the emails.
Step 5 Format the Look of the Meeting Room
The Waiting Room page also gives you the opportunity to customize the invitation. Place an image with the topic title, brand colors, and a picture of the webinar hosts. This lets attendees know they’re in the right place and keeps them at ease, while building anticipation.
On the eztalks Waiting Room page, you can scroll down to customize the agenda. You can put in the pain points you intend to solve, and what attendees should gain at the end of the webinar. You can use the webinar invitation email sample pain points here.
Step 6 Send your Webinar and Watch It Go to Work
Once you’re satisfied with the look and feel of the message, head back to your invite page and send by clicking invite, or send your invite directly from your email provider. From here, you should see a significant increase in your email invites. Why? Because you took the time to send them a personalized message.
Webinar invitation templates should be discarded because of lack of uniqueness when doing the customized invitation, no matter how the free webinar invitation templates will save your time as marketing states. What you need to do, is to collect the excellent webinar invitation samples, and figure out the common points they have that you may use in your invitations.
Conclusion
If you take a little time to add a personal touch to your webinar invites, you can get more attendees than you hoped for. Use an easy to use webinar provider, like eztalks. You can spend more time creating the email copy and look, than figuring out how to create the webinar.